“Social Network Integrations” Documentation by “WPWeb”
- WooCommerce / EDD – Social Login
- Social Auto Poster
This document provides instructions for properly setting up a Facebook application to enable user login/registration via Facebook on your site.
Creating a new app
You need to create a Facebook app to allow users to log in to your site with their Facebook account. To create a new Facebook app, please follow these steps:
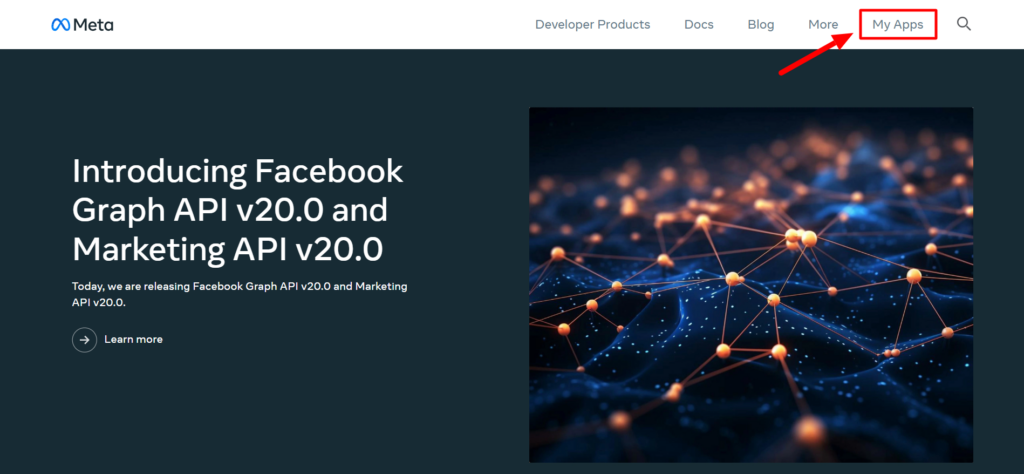
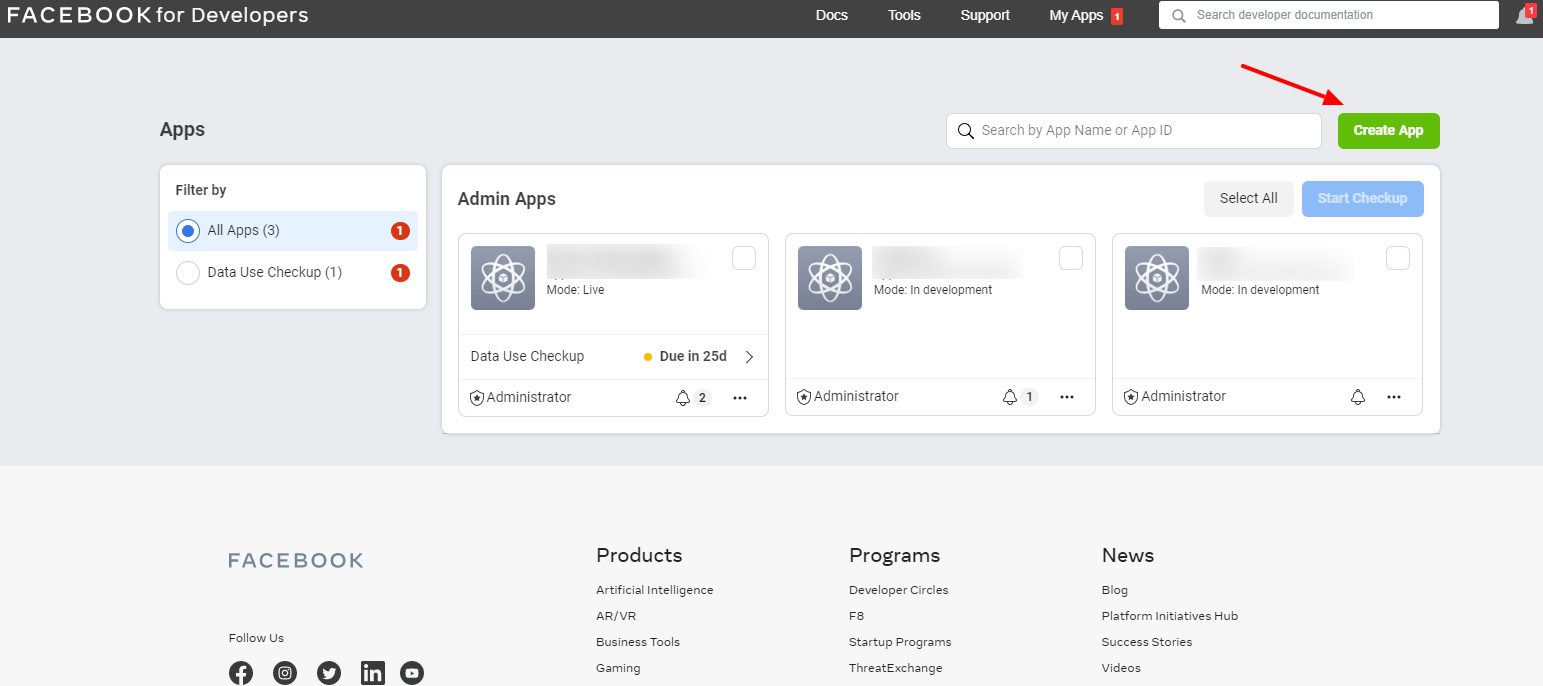
1. Go to the Facebook Developers site.
2. If you are not logged in, log in using your Facebook account details.
3. Once logged in, navigate to ‘My Apps’.
4. Click on the ‘Create App’ button. It will lead you to the app creations page.
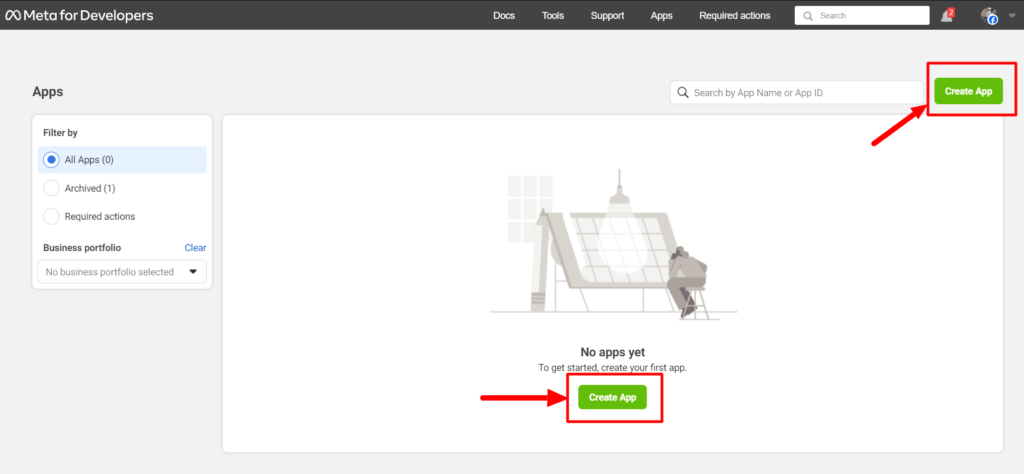
A message will appear that there’s a new way to create apps with Meta, click the ‘ Create App’ button to continue.
Configure App
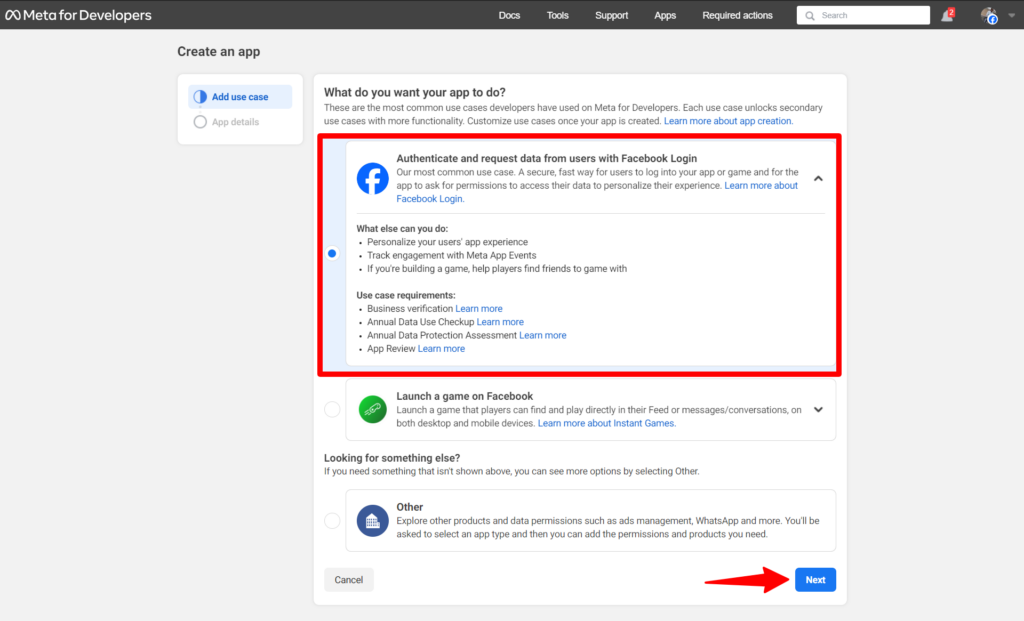
1. On this page, in the Add use case tab, select “Authenticate and request data from users with Facebook Login” from the suggested use case , and then click on the ‘Next’ button.
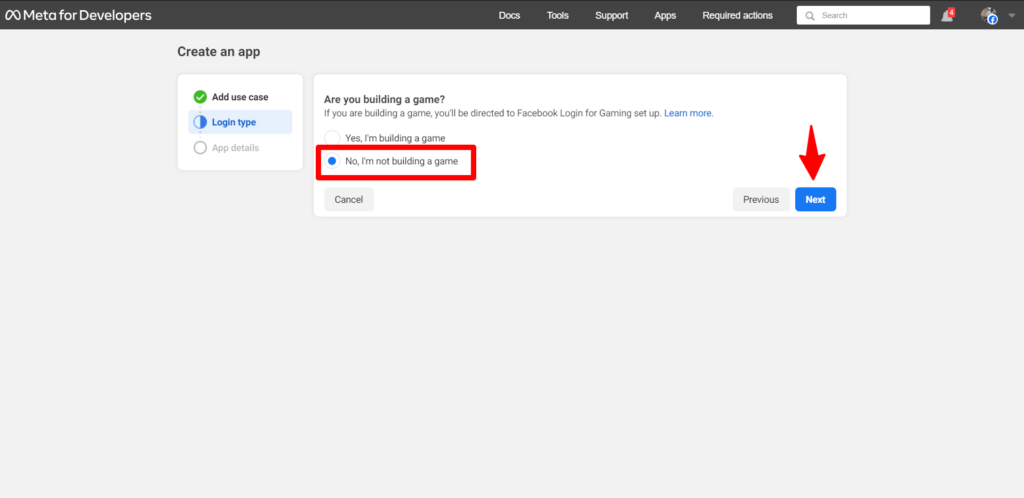
2. In the Login type tab, select “No, I’m not building a game” as your login type, so you will not be redirected to the gaming setup, then click the ‘Next’ button to proceed.
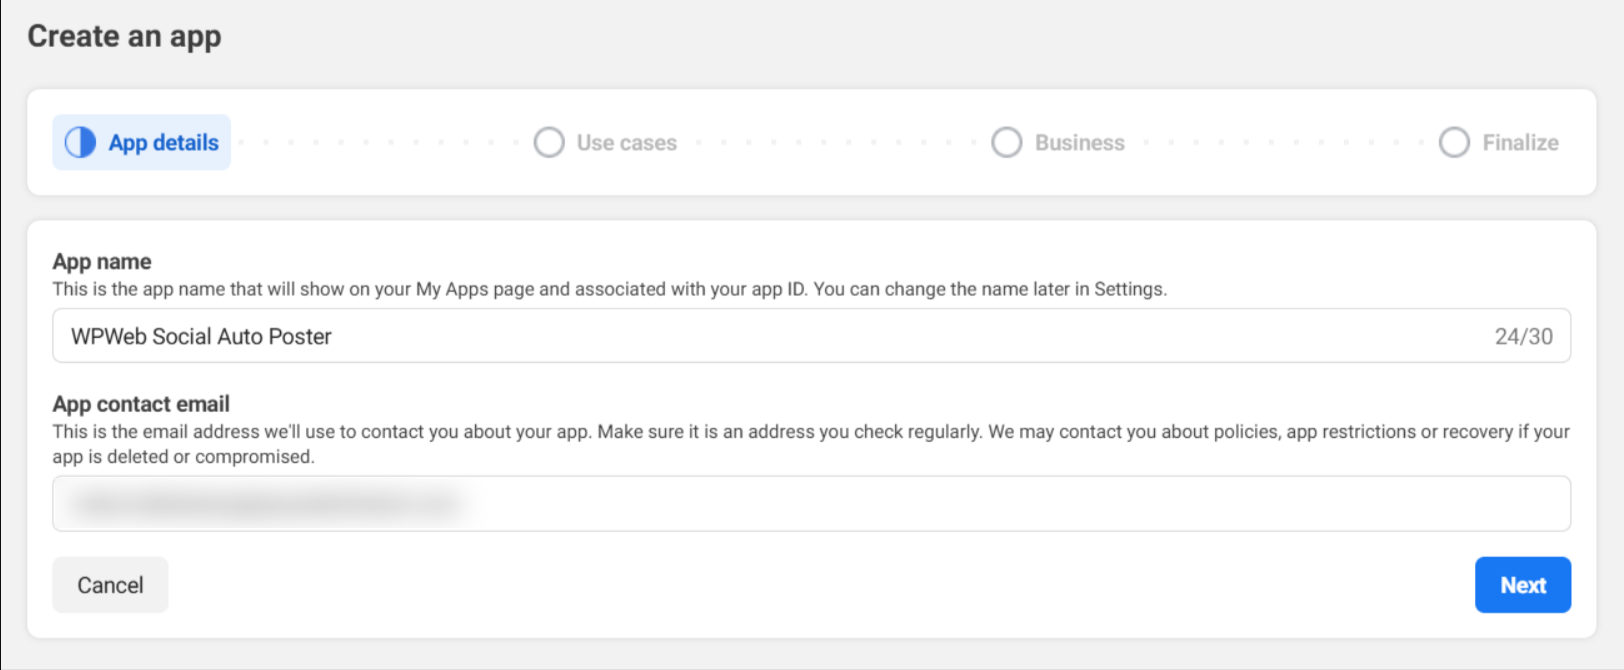
3. Fill out the App Name and App Contact Email. Then click the Create App button.
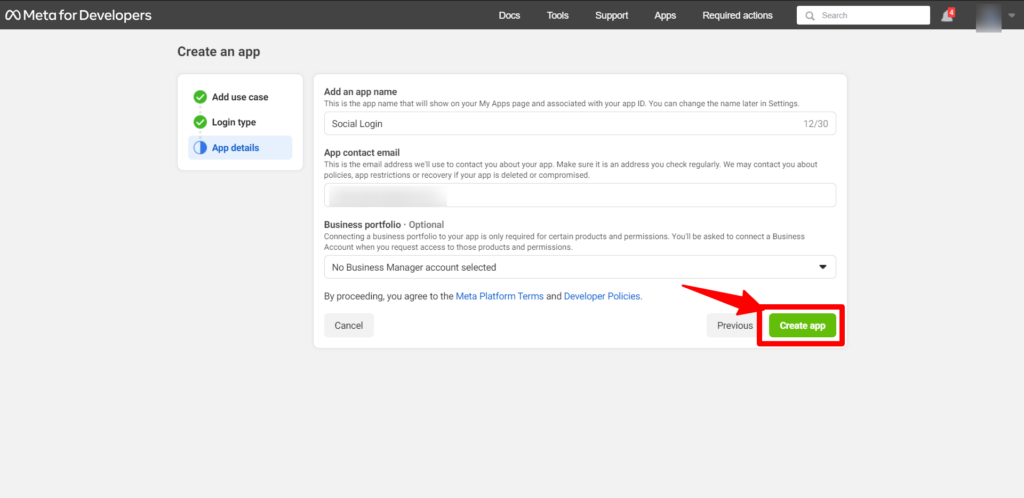
Note: After clicking the ‘Create App’ button, you may be presented with a security check.
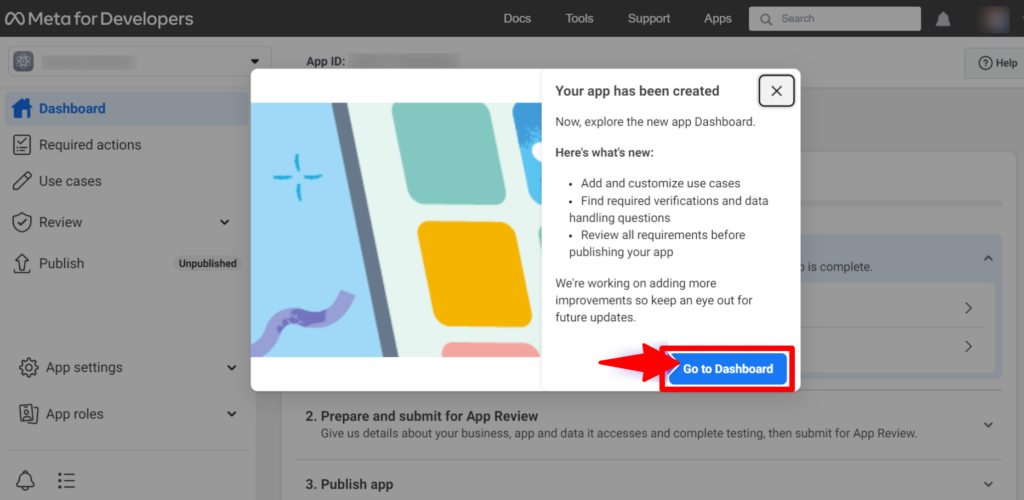
4. Upon successful creation, a message window will appear that your app has been created. Click the ‘Go to Dashboard’ button to proceed to the dashboard.
Customize and Publish App
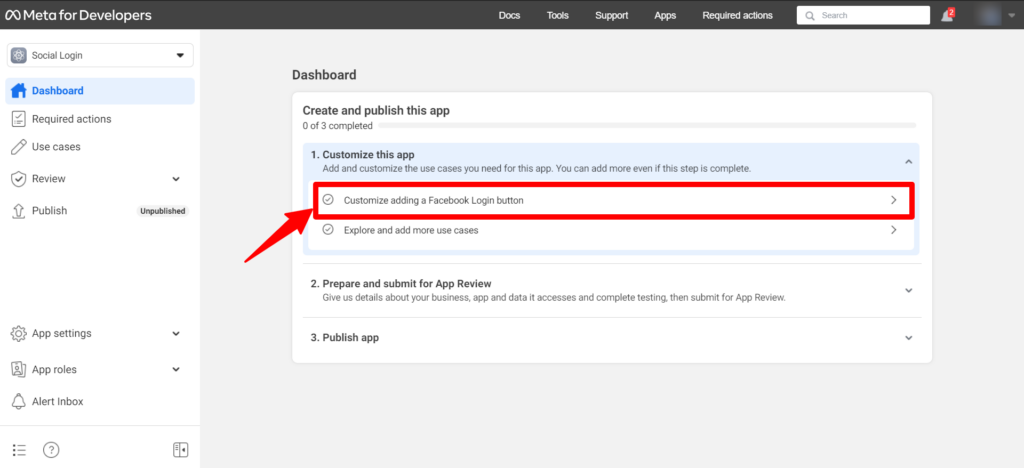
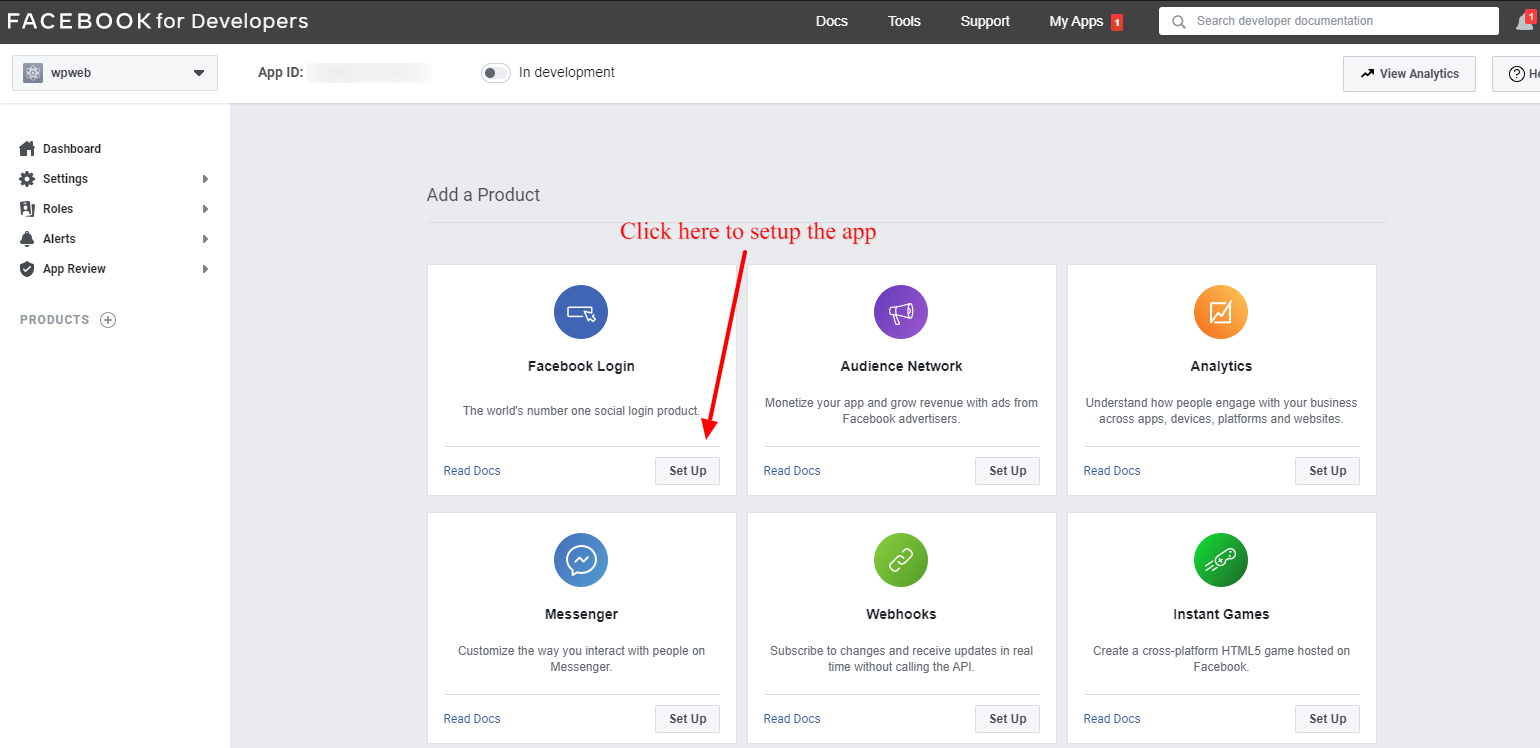
1. In the dashboard, click on the ‘Customize adding a Facebook Login button’ to set up your product.
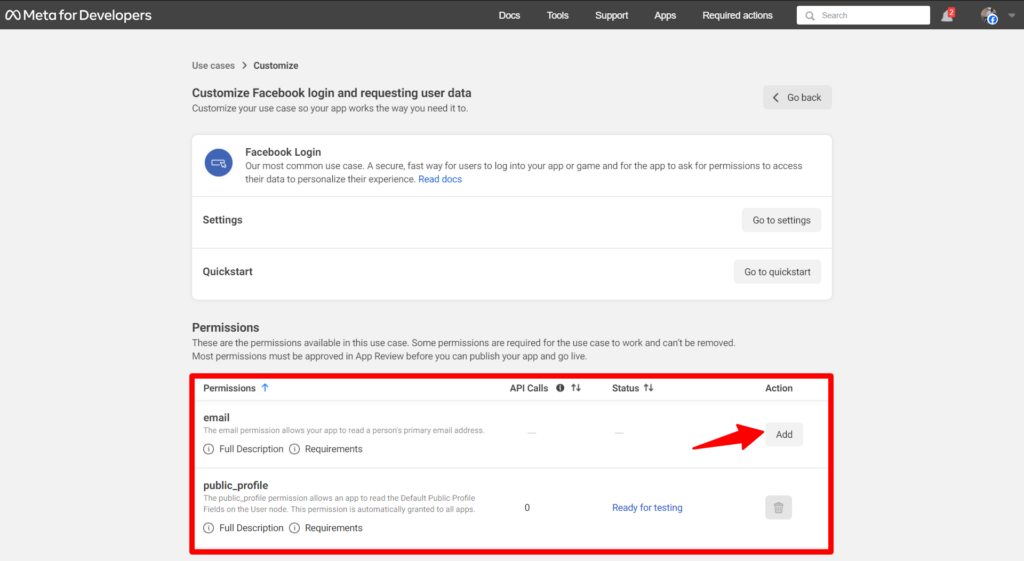
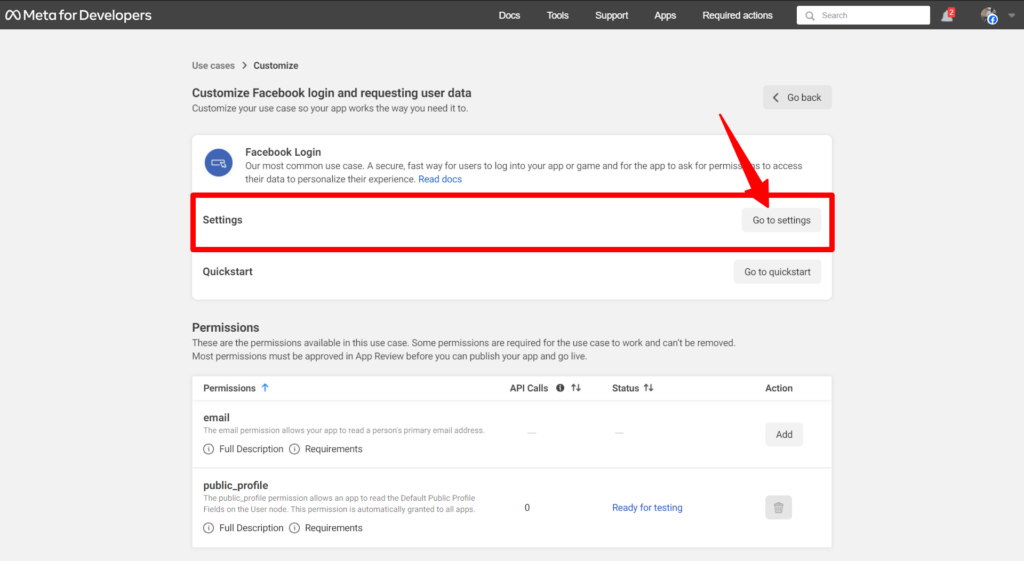
2. Scroll down to the Permissions section and add ‘public_profile’ and ’email’ permissions by clicking on the ‘Add’ button.
3. After you have added the permissions, go to settings by clicking on the ‘Go to settings’ button.
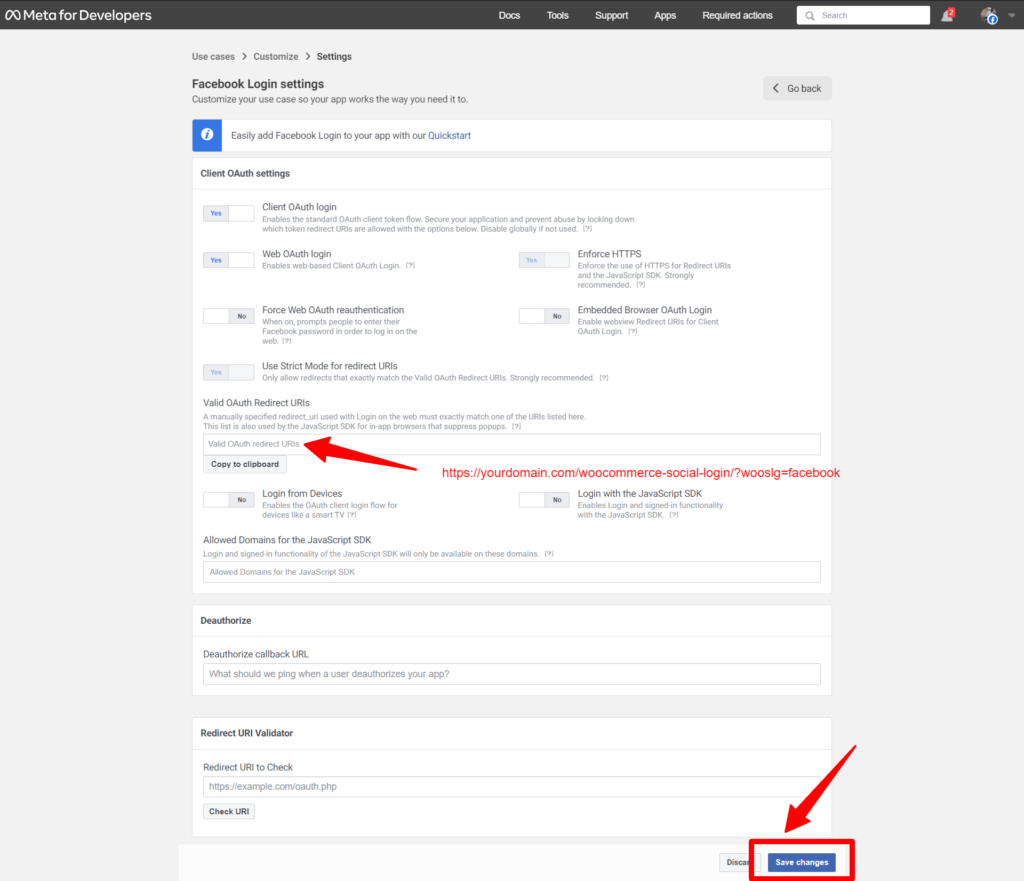
4. In the Client OAuth Settings, you need to enter “Valid OAuth redirect URIs.” from our plugin settings.
See the example below: https://yourdomain.com/woocommerce-social-login/?wooslg=facebook
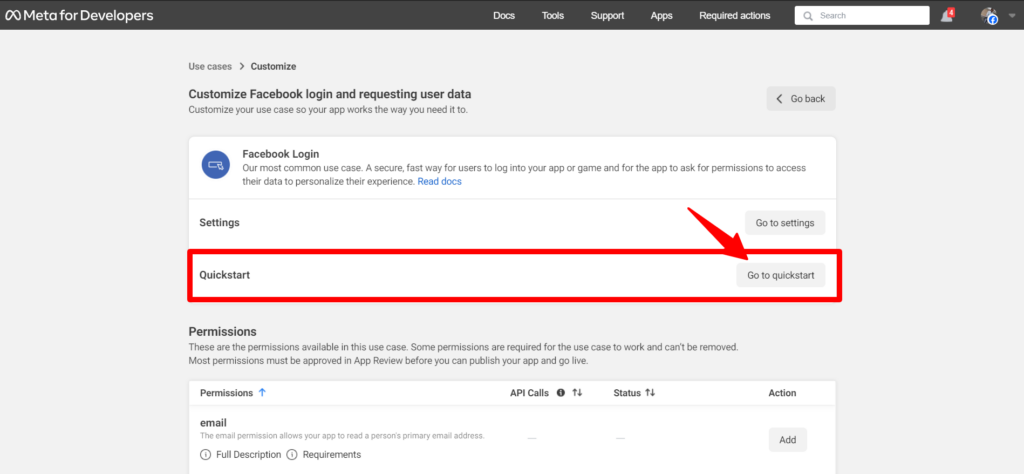
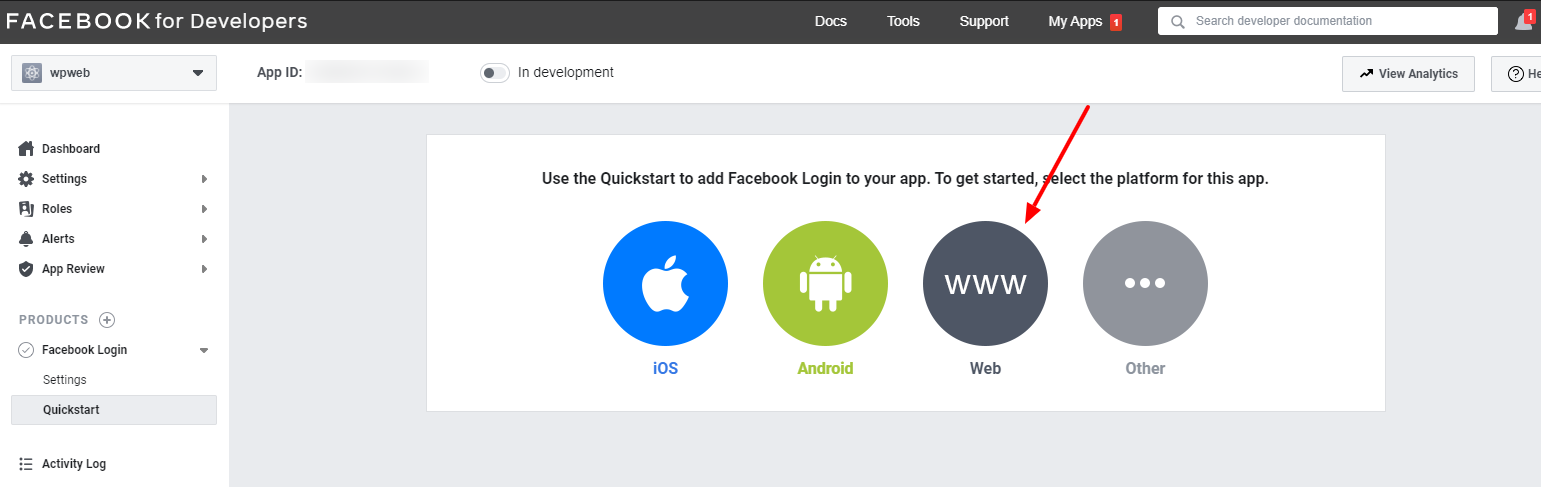
5. After you have saved the changes, go back to Customize and click on ‘Go to quickstart’
And Click on “Web”
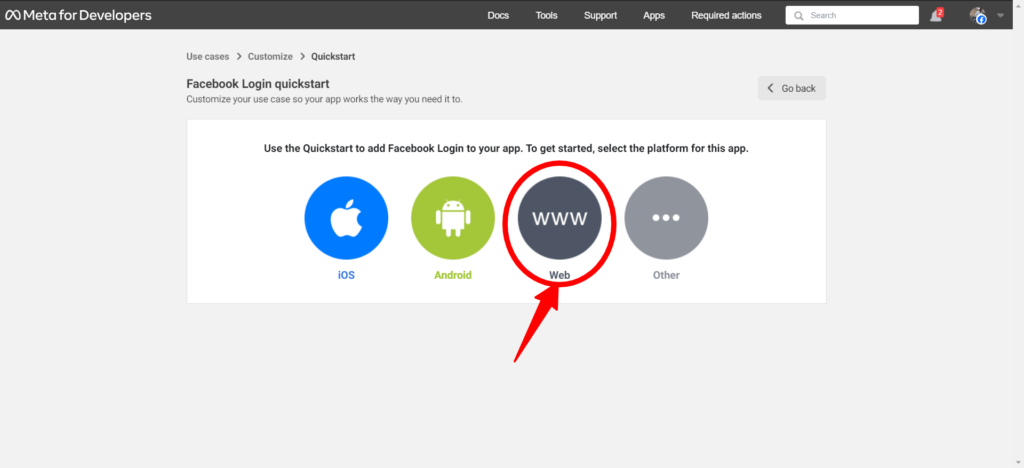
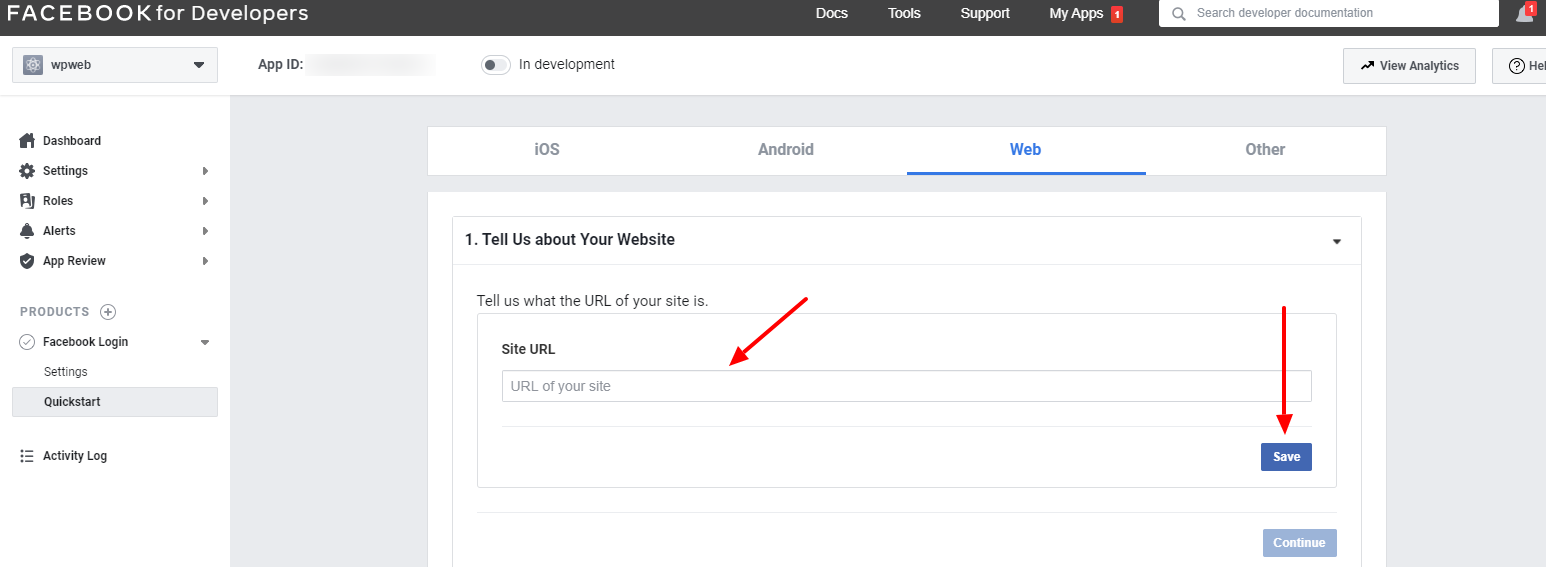
6. Select the Web platform for your app, then add your Site URL, then click the “Save” button.

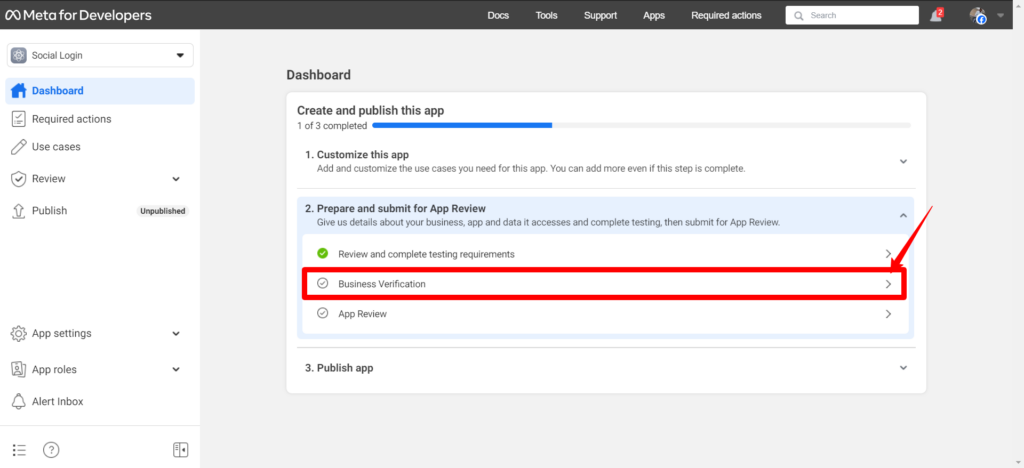
Prepare and submit for App Review
Note: Additional steps may be necessary. Ensure that all required verifications and data handling questions, if applicable, are completed before submitting the application to App Review. If you do not have a Facebook business account, please follow the instructions provided here.
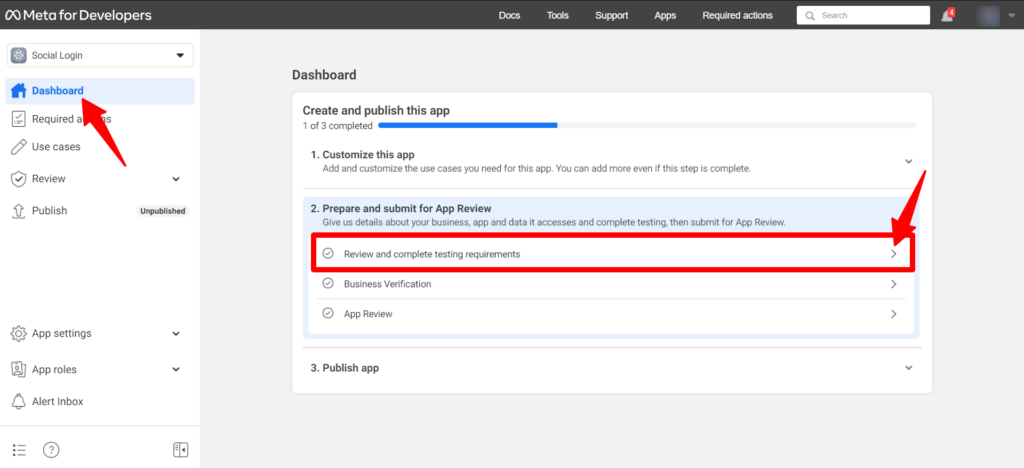
1. In the Prepare and submit for App Review, click on ‘Review and complete testing requirements’, it will redirect you to Graph API Explorer.
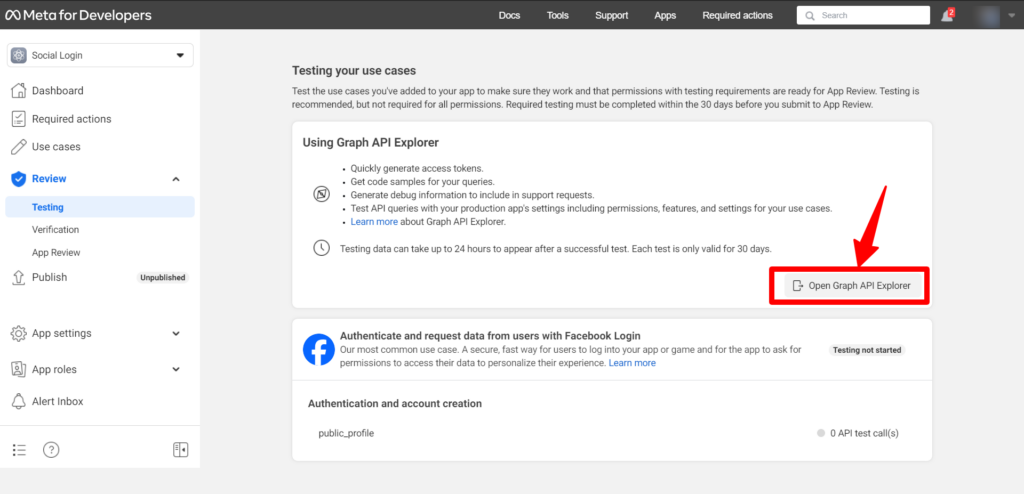
Click on open Graph API Exploer
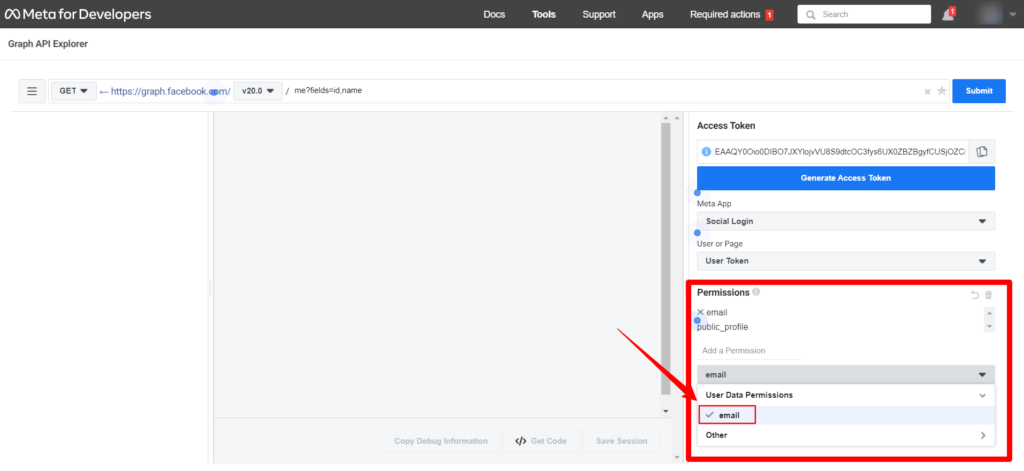
2. On the right section of the Graph API explorer add the public_profile and email. To add a permission go to permission > User data permissions > email.
3. Once added, click on Generate Access Token and Submit buttons.
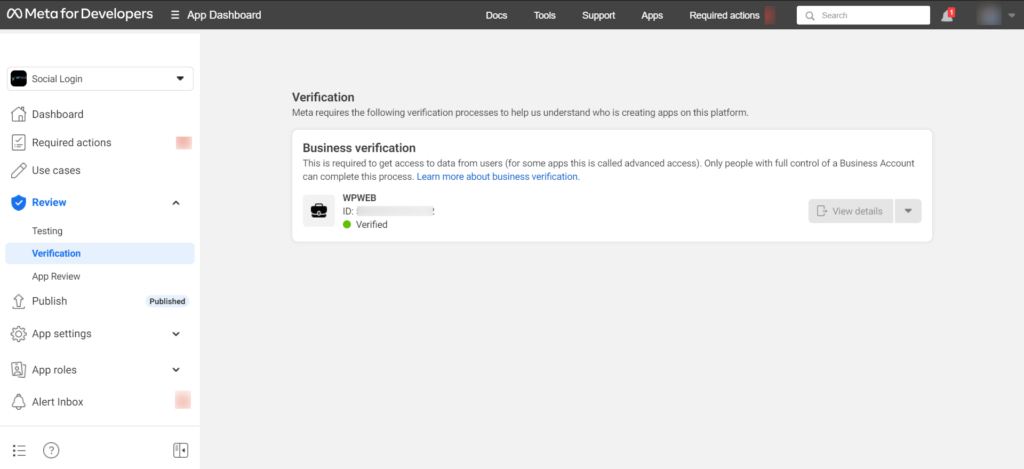
4. Go back to your App’s Dashboard, and click on Business Verification, it will redirect you to the verification page. This is where you can add your business account.
5. This step is necessary to obtain access to user data, commonly referred to as advanced access in certain applications. Completion of this process is restricted to individuals with full control of a Business Account. For further information on business verification, please refer to this article.
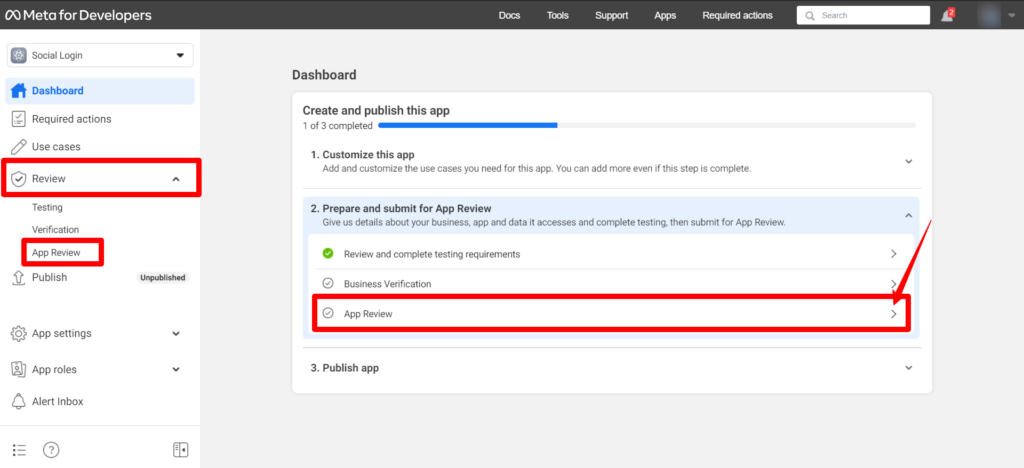
6. Once you have successfully added a verified business account, return to the App Dashboard or, from the side menu, click on Review > App Review. This will redirect you to data handling questions where you need to provide answers related to the app review.
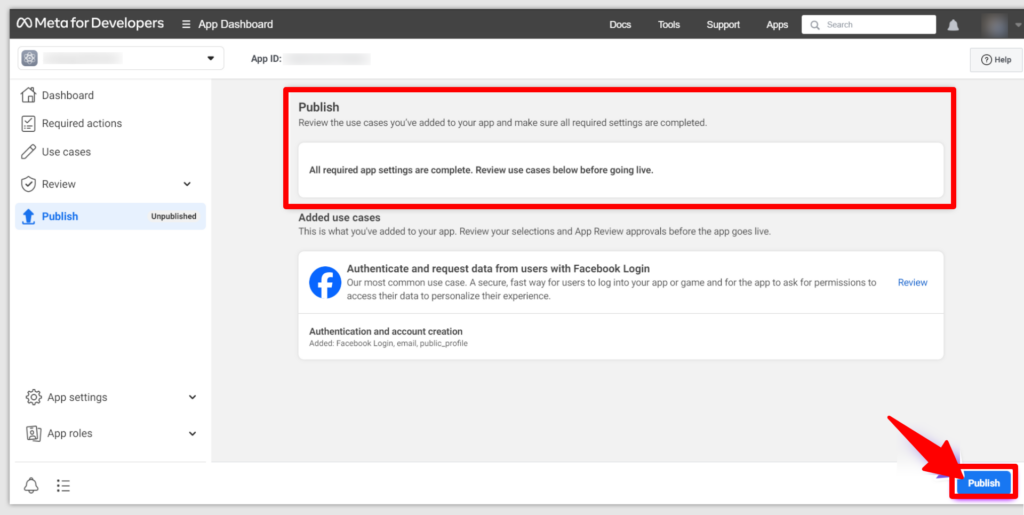
Publish
1. Go to the Publish tab from the side navigation menu. Then click on the ‘Go to app settings’.
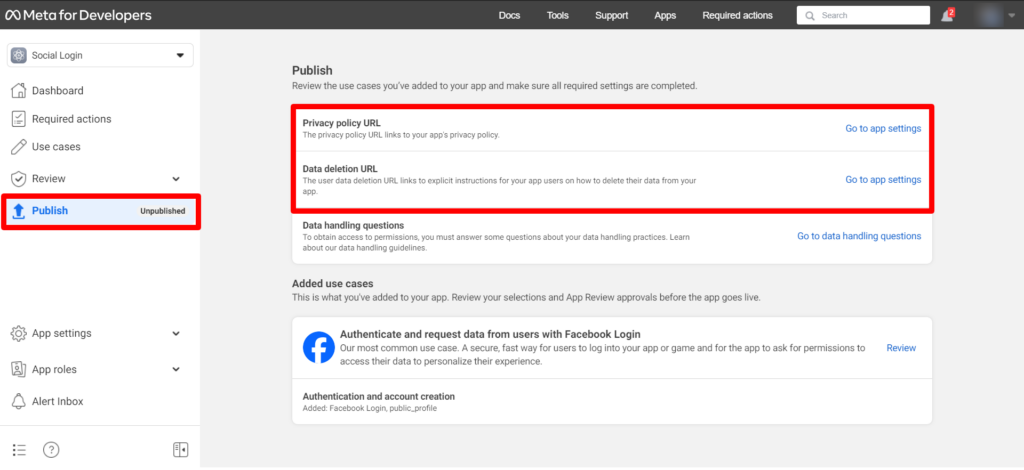
2. You must fill in the following information: Privacy Policy URL, Terms of Service URL, User data deletion and you can also include an app icon to make the app appear more professional. Then click the ‘Save changes’ button.
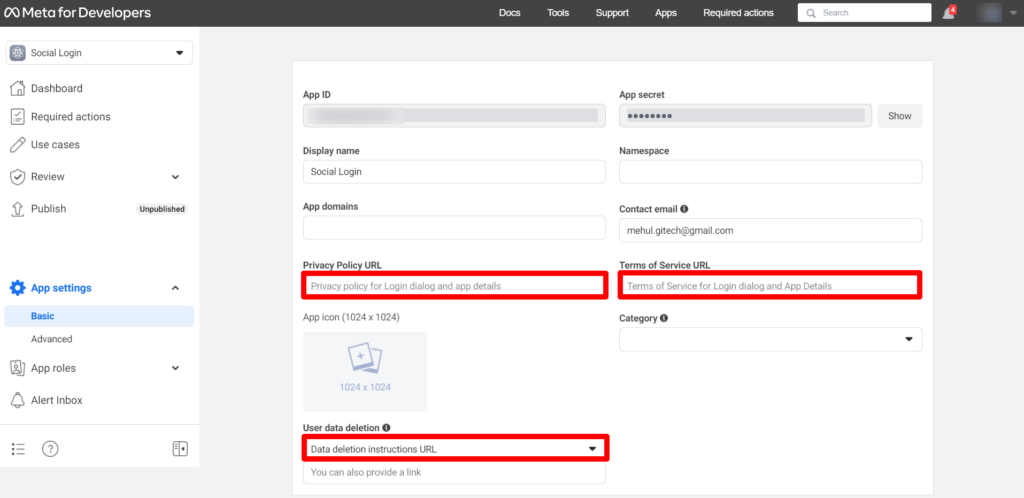
For the “Data Deletion Instruction URL,” you can use a URL similar to the following example.
E.g https://www.wpwebelite.com/facebook-privacy-policy/#deletion-request
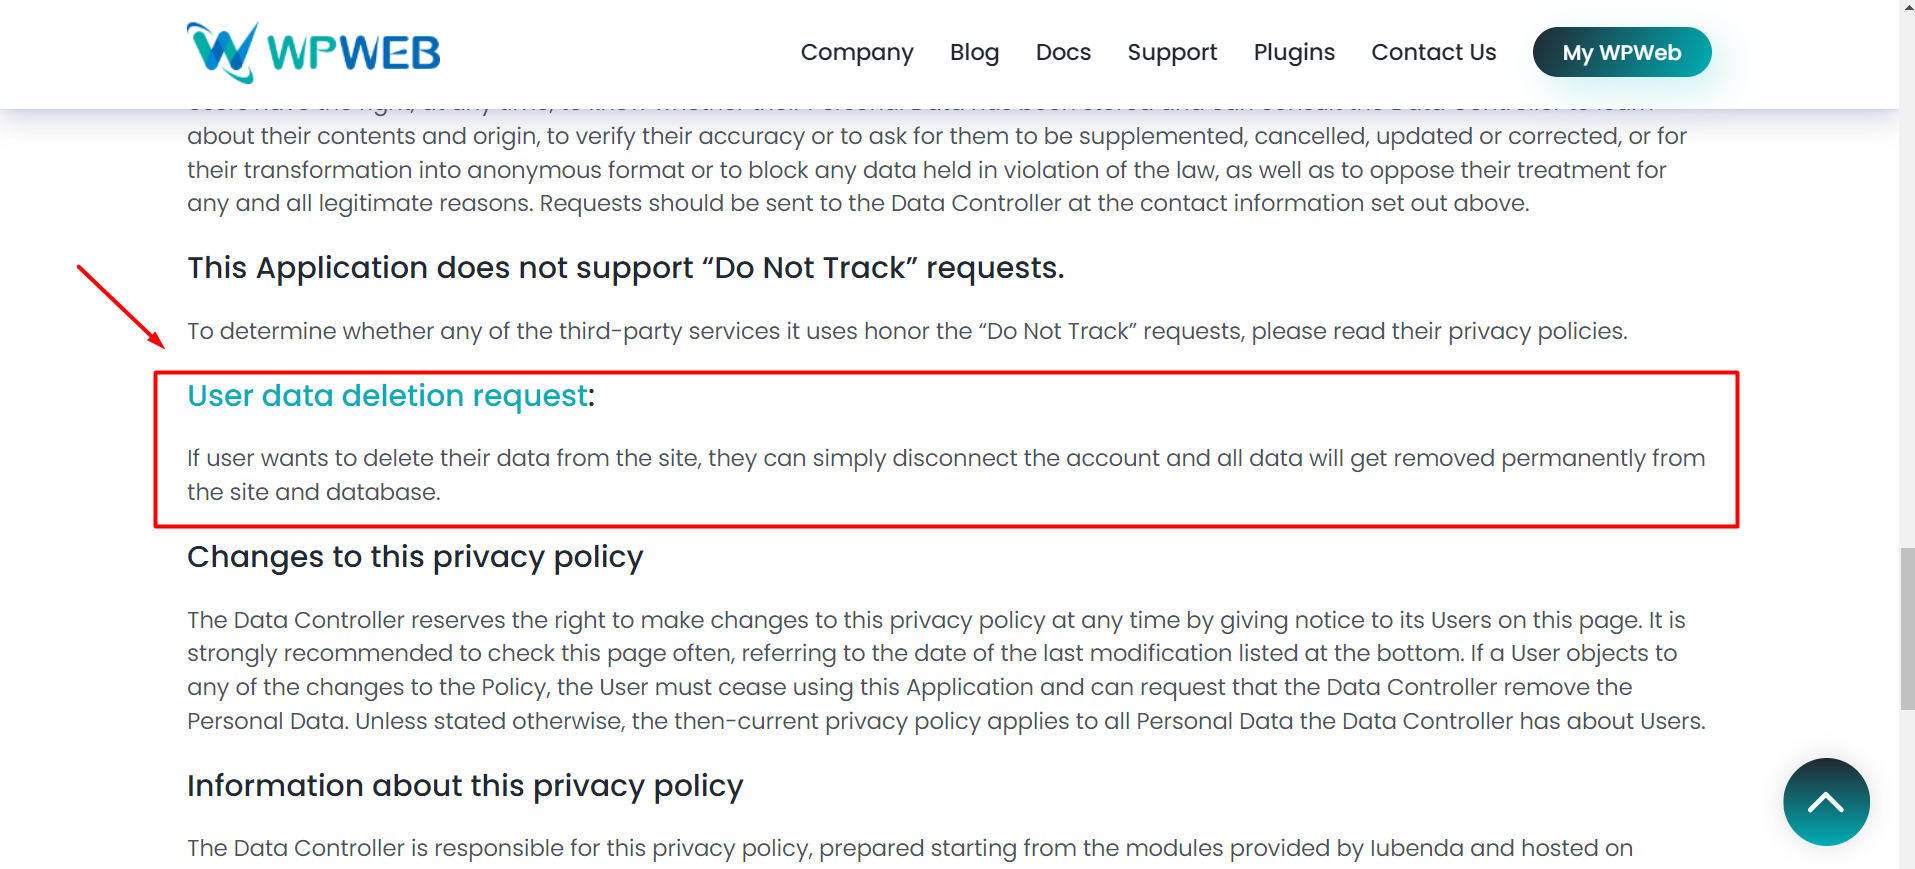
Additionally, your page should include a description of the “User data deletion request” as shown in the image below:
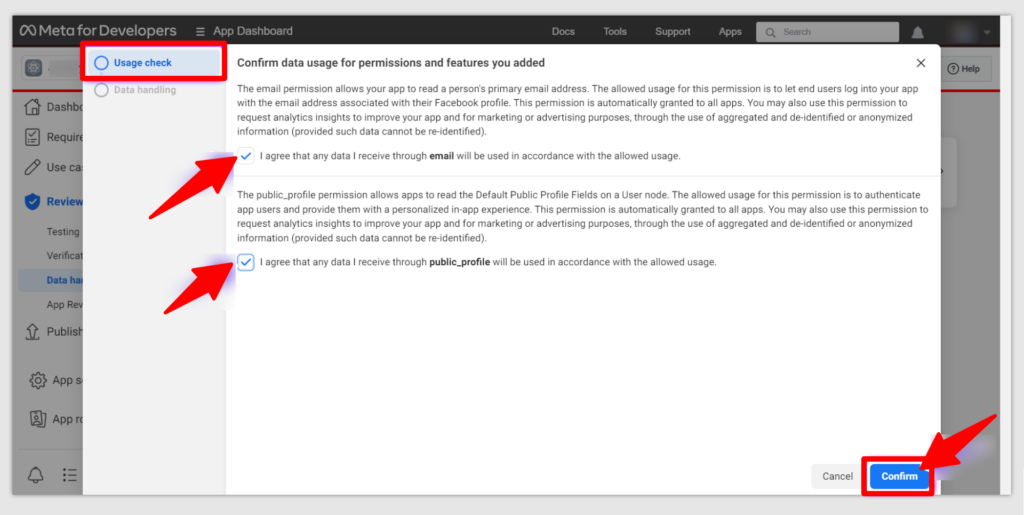
3. To begin, select “Answer questions about data handling,” and a window will promptly appear. Within the Usage Check tab, carefully review and confirm the data usage permissions and features you have added. Use the checkboxes to indicate your confirmation and agreement, and then click the confirm button to proceed.
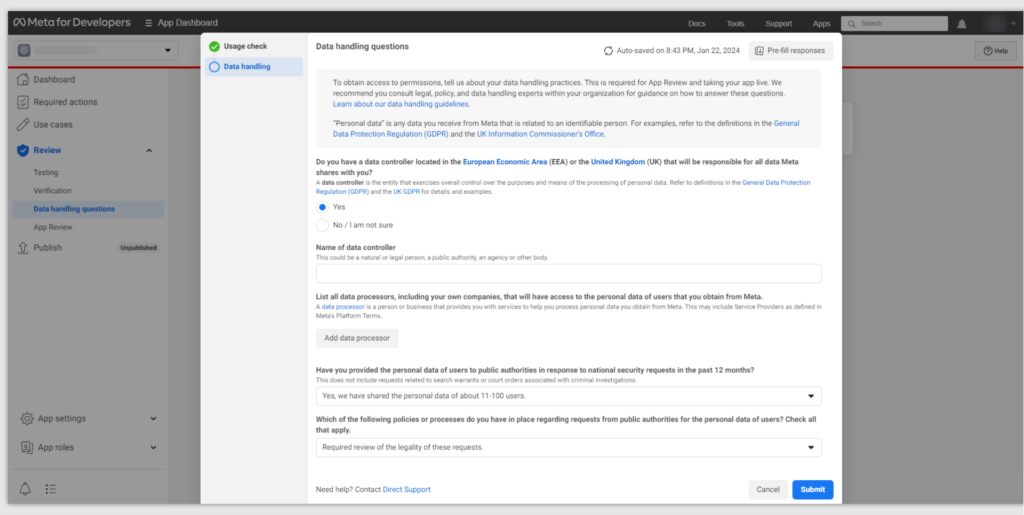
4. Now, in the Data Handling tab, provide information regarding your data handling practices to obtain access to permissions. This is a mandatory step for App Review and the subsequent launch of your app. Answer the questions and click the Submit button.
5. Ensure all required settings are completed and use cases are reviewed before you click on the ‘Publish’ button, the app can’t be published if the requirements are incomplete.
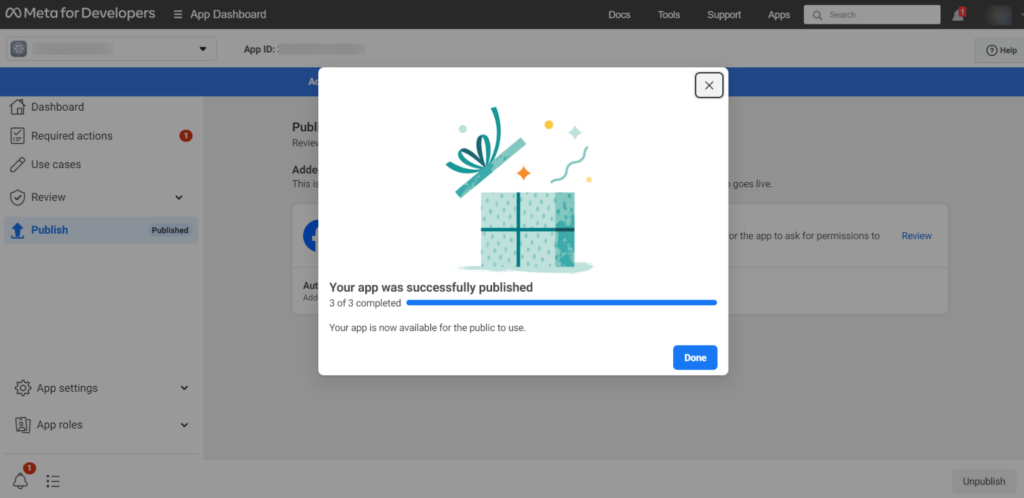
- Note: After clicking the ‘Publish’ button, you may be presented with a security check.
- After successfully publishing your app, a confirmation message will be displayed indicating that it is now available for the public to use. To proceed to the next step, simply click the ‘Done’ button.
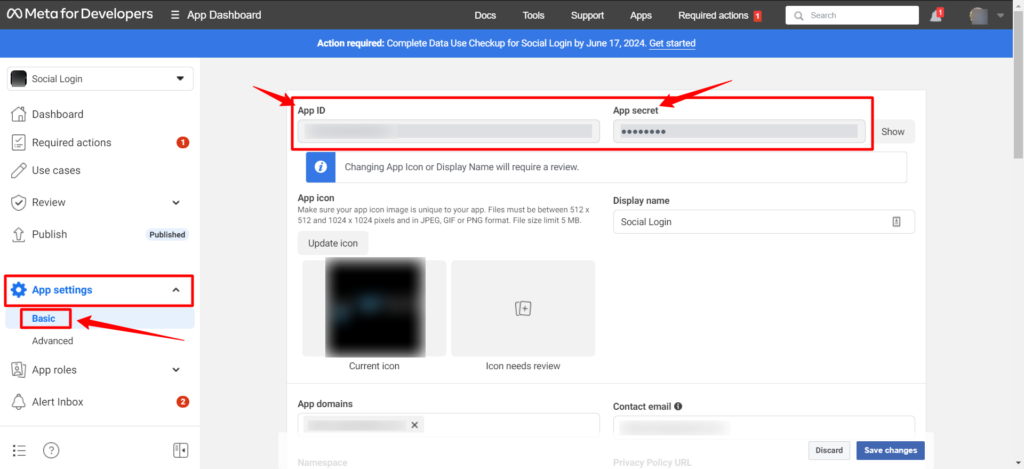
App ID & App secret
With your app successfully published, the next step is to integrate Facebook with WooCommerce Social Login. To achieve this, you’ll need both the App ID and App Secret.
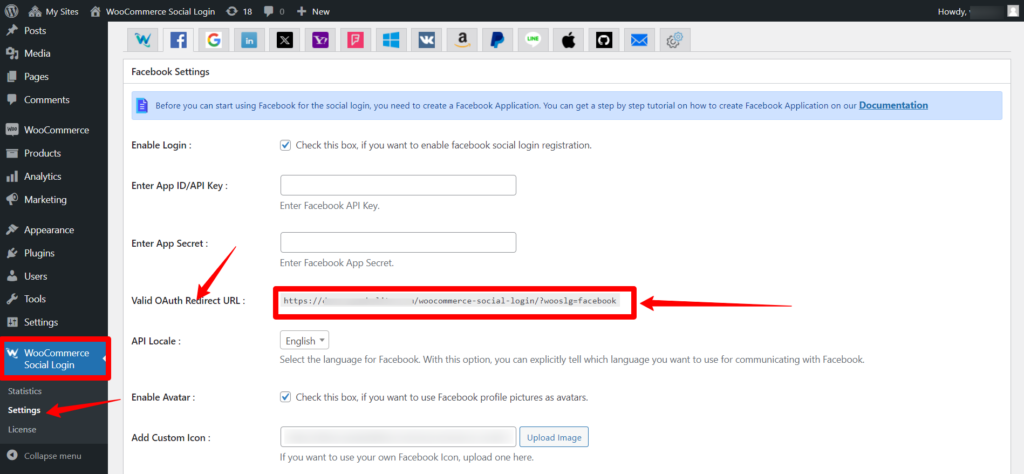
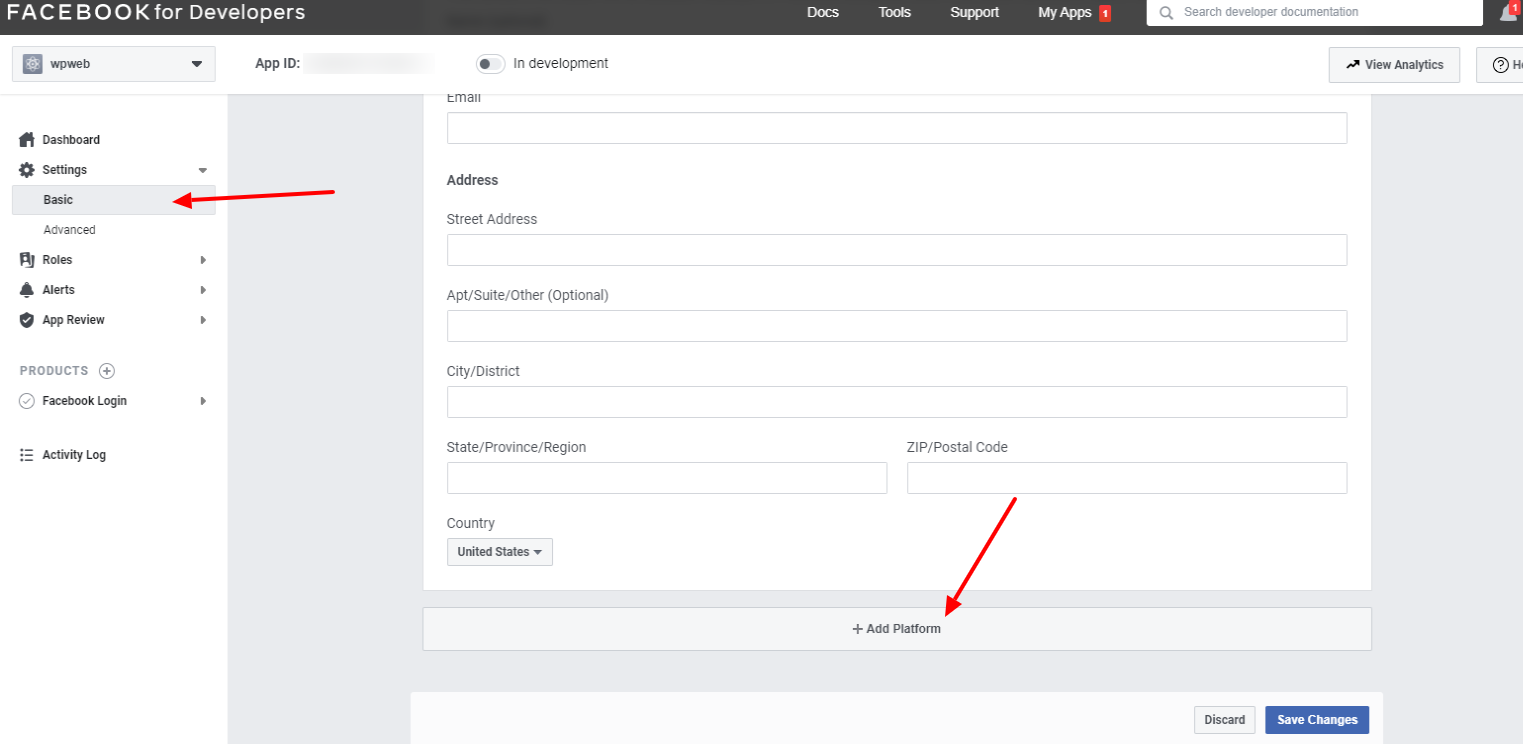
In the side navigation menu, navigate to App Settings > Basic. Here, you’ll find both the App ID and App Secret.
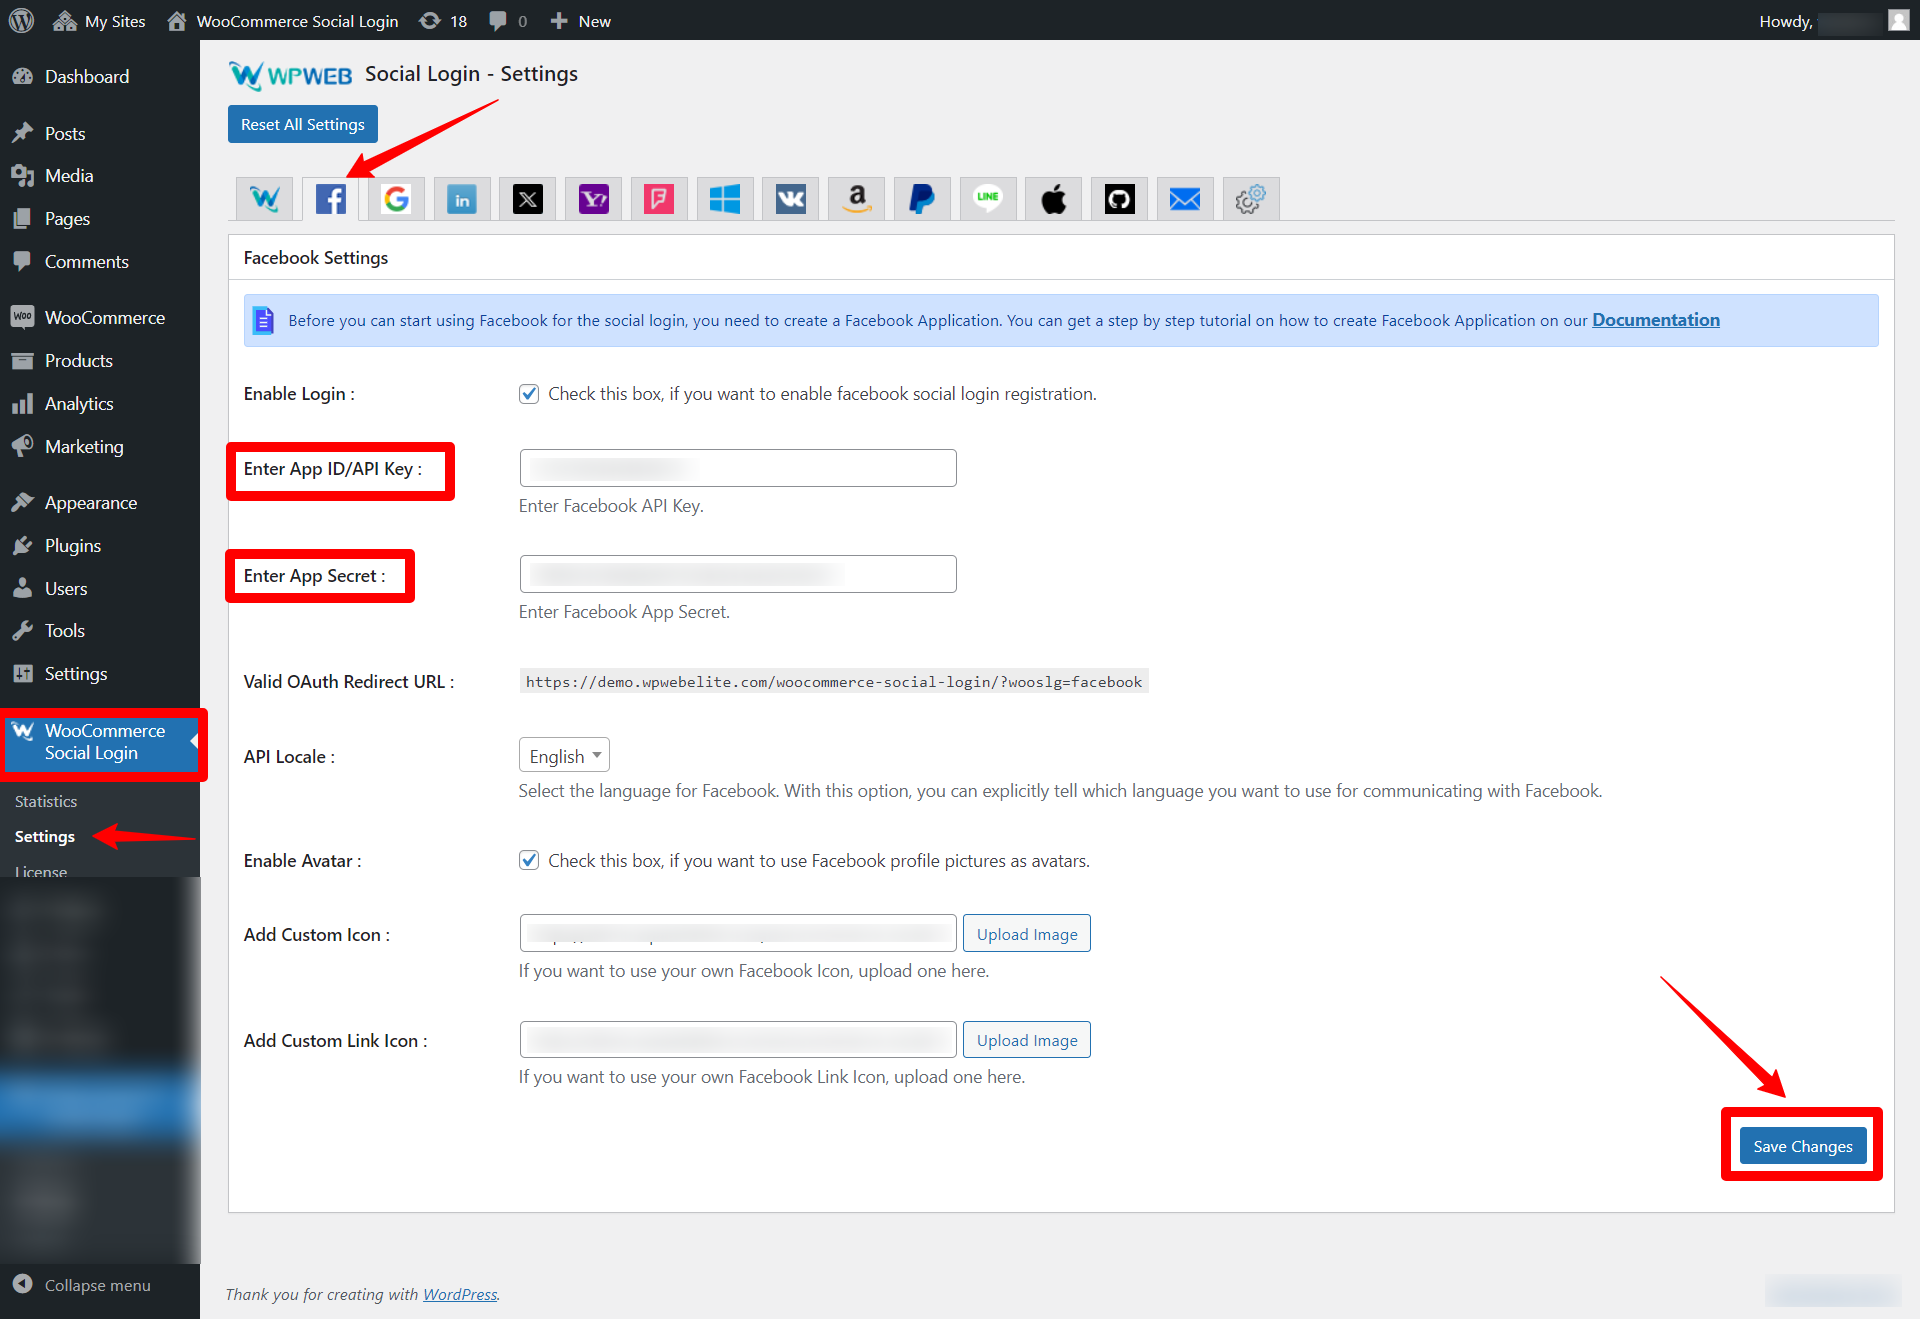
Copy the App ID and App Secret, then proceed to wp-admin > WooCommerce Social Login > Settings > Facebook tab. Paste the copied values into the respective fields and finalize the process by clicking the ‘Save Changes’ button.
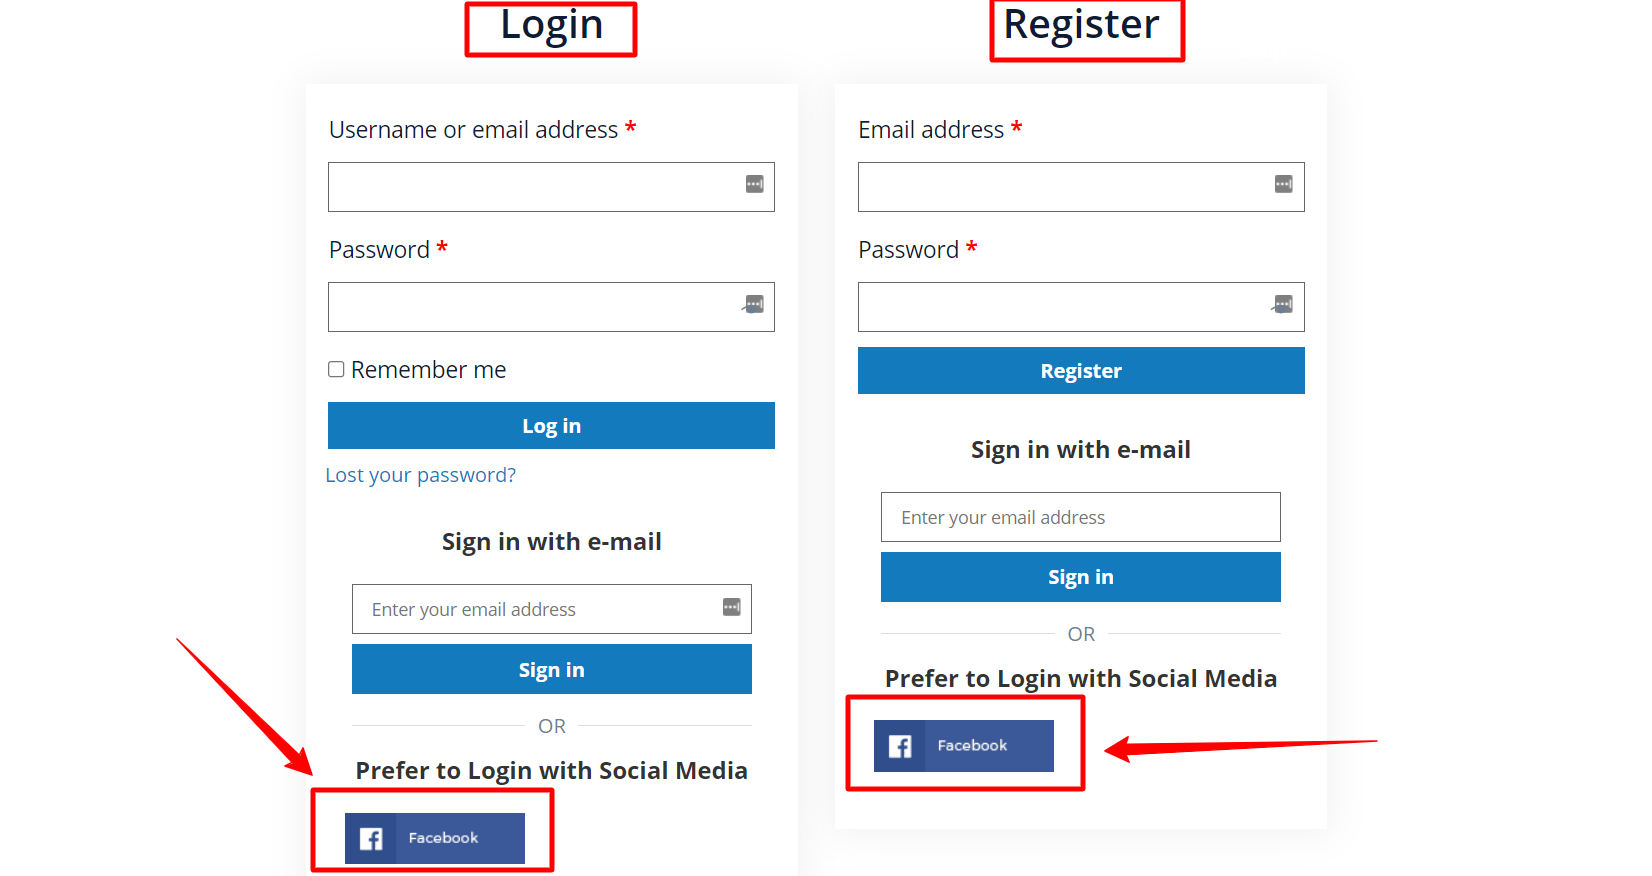
Show social login button on Login & Registration Form.
To create a Facebook App, go and visit: http://developers.facebook.com/
Step 1:
Click on the “Create New App/ Add a New App” link.
Step 2:
Enter the App Display Name and the contact email and click the “Create App ID”.
Step 3:
Now it will redirect to the “Add Product” page and in this page click the “Set Up” button in “Facebook Login”.
Step 4:
Click the “Web” button.
Step 5:
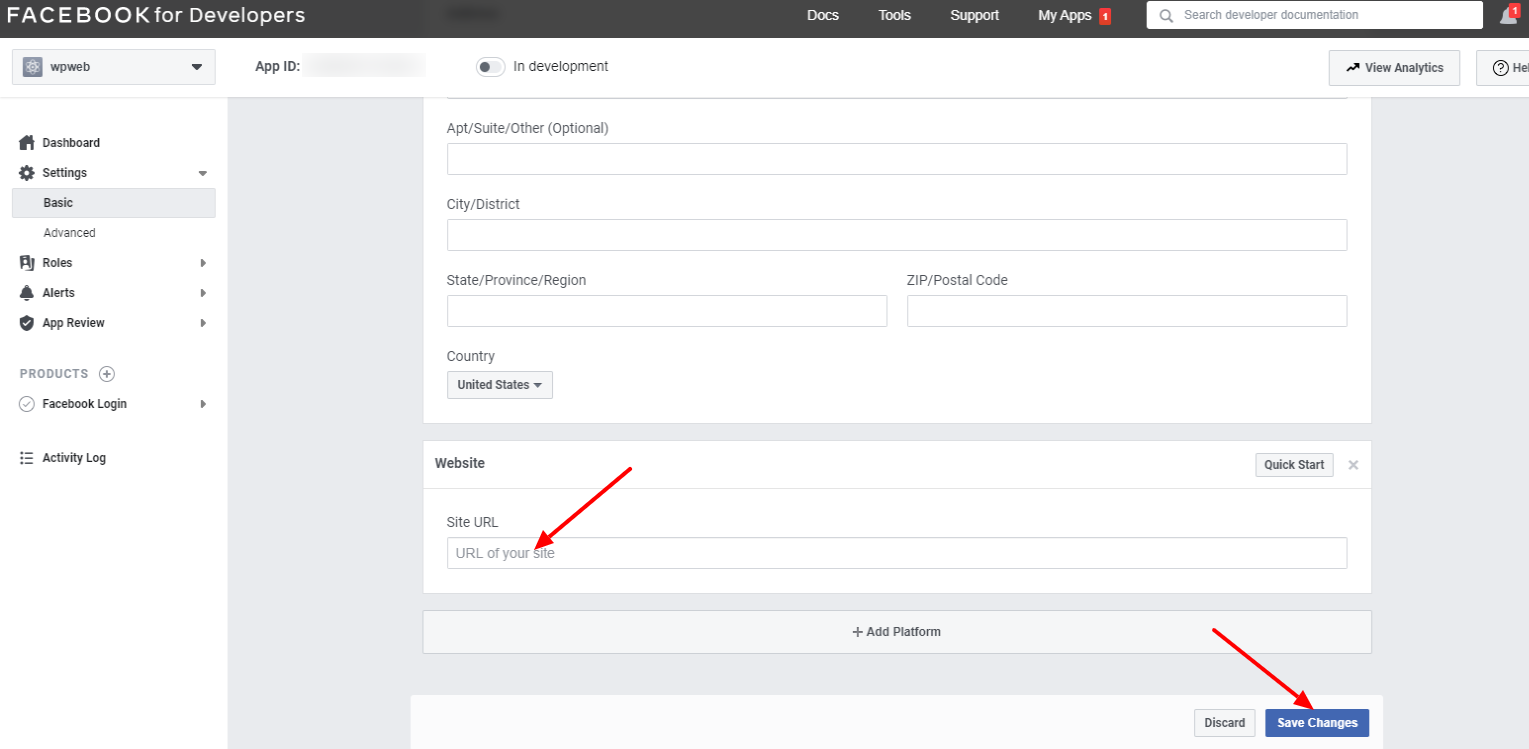
In the “Site URL” section add your site url and save it.
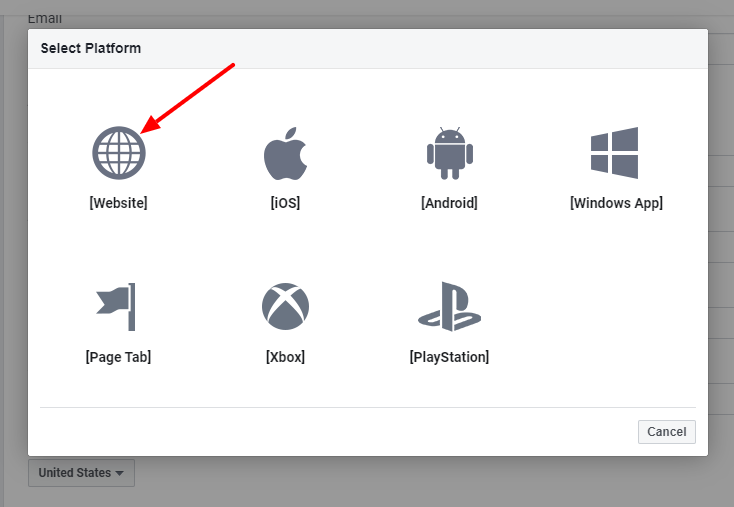
Then select the “website” as given below.
In this page you can add the site url and save it.
Step 6:
Click on the “Facebook Settings” as shown below.
Here enter the “Valid OAuth redirect URIs”.
Please use this OAuth redirect URI in the facebook settings.
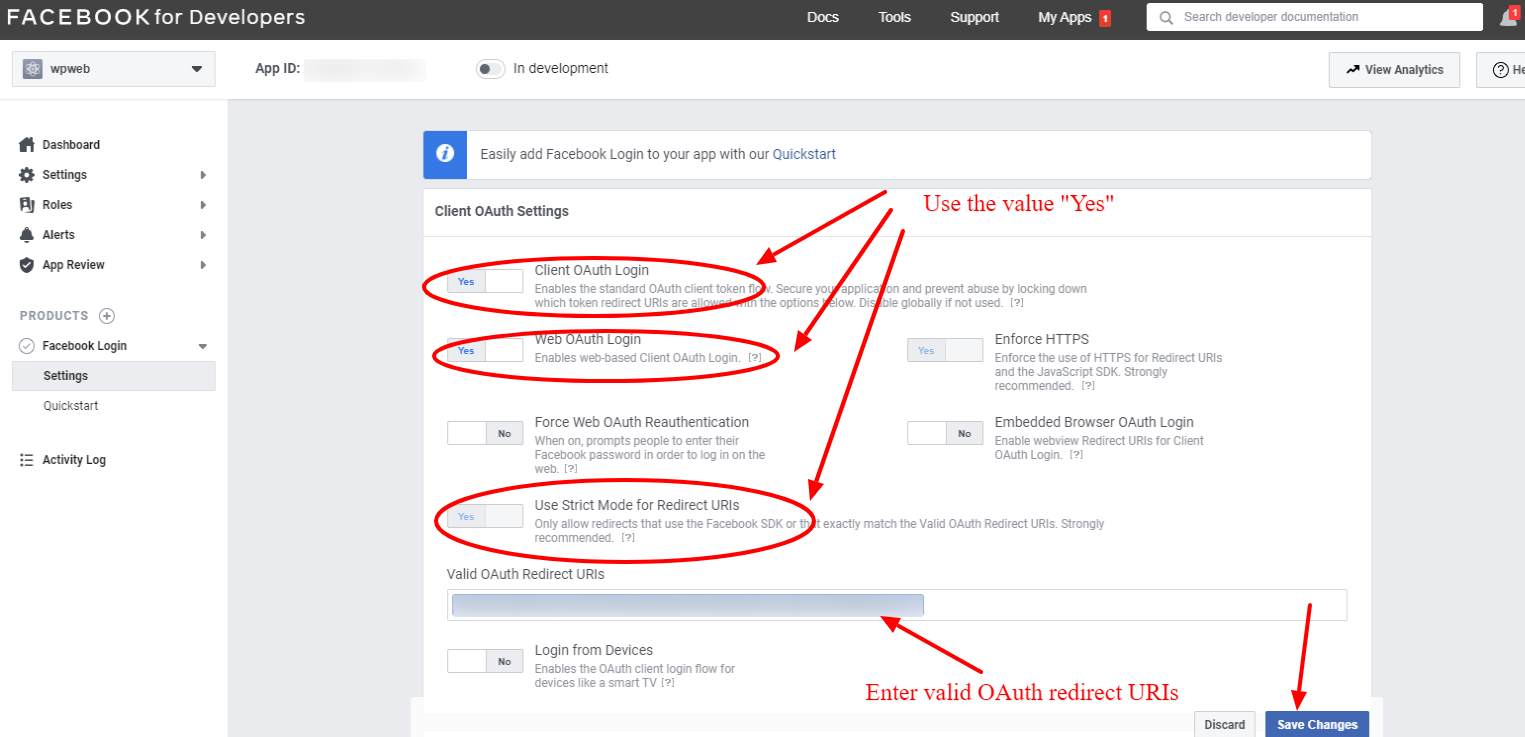
After entering the OAuth redirect URI and enable the “Client OAuth Login and Web OAuth Login”, please save the changes.
Step 7:
The app is ready now. Click the “Settings > Basic” link in the menu to see the app id and secret.
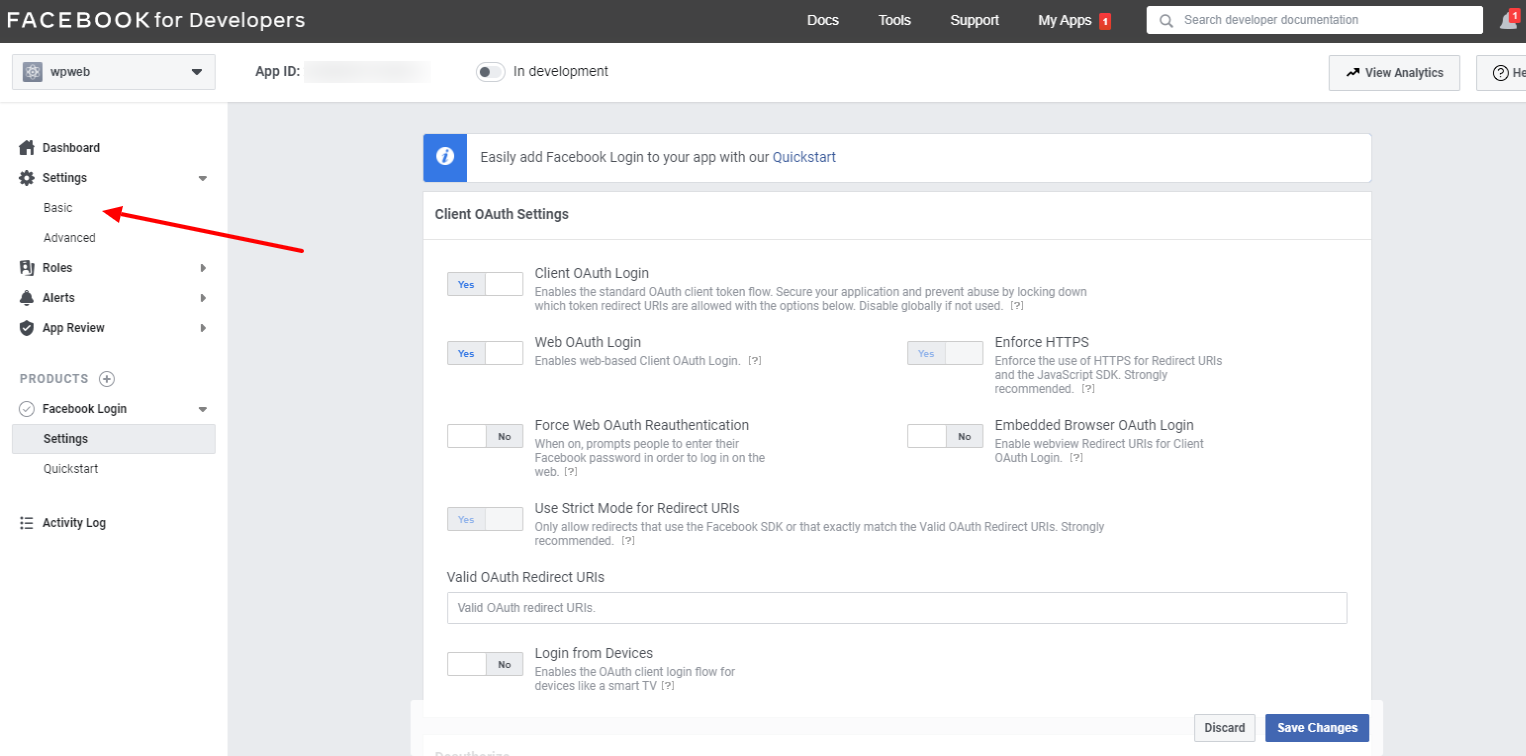
In the “Settings > Basic” we can see the App ID and App Secret.

The App ID and App Secret are now ready. Click the “Show”button to see the App Secret. (The app secret is in alphanumeric and DON’T use ******* as App Secret.)
Step 8:
Here the app is in development mode. Only the developer can view the posts now.
We need to “submit the app for approval” and after the app get approved, we can make the app public and the users can see the posts in the facebook.
The App Review Process Submission is given below.
1: First of all, individual OR business verification is necessary to got app approval. As you are an end user of the plugin, you have to do individual verification for the app. Simple steps you can found here.
Once individual verification done, you will receive verified badge like the screenshot below:

2: Go to “App Review” > “Permission and Features” menu
3: Find ( business_management, pages_show_list, pages_read_user_content, pages_manage_metadata, pages_read_engagement, pages_manage_posts ) permissions and click the “Request” button in front of each one.
4. Click the “Continue the Request” button. Fill the form for each permission, and send your App to review. You need to wait up to 5 days. A random Facebook worker will review it. If that worker does not have knowledge about plugins or WordPress, he does not review your request properly and declines it. Please try to re-submit the same request again. Eventually, your request will be accepted. Use this text for review form:
I have a WordPress blog site. Every time I create a new blog post I need to share its link on my personal social pages and groups.
Now I purchased WordPress plugin, named “Social Auto Poster” which allows me to share my blog posts on social media automatically. It will save my time a lot so it enhance my plugin(app) and website functionality and user experience
by saving a time and making my system fully automated. Therefore I need to create a Facebook App. Have a look at the screencast.
You can test it on the demo version of the plugin:
https://yourdomain.com/wp-admin/
Username: *******
Password: *******
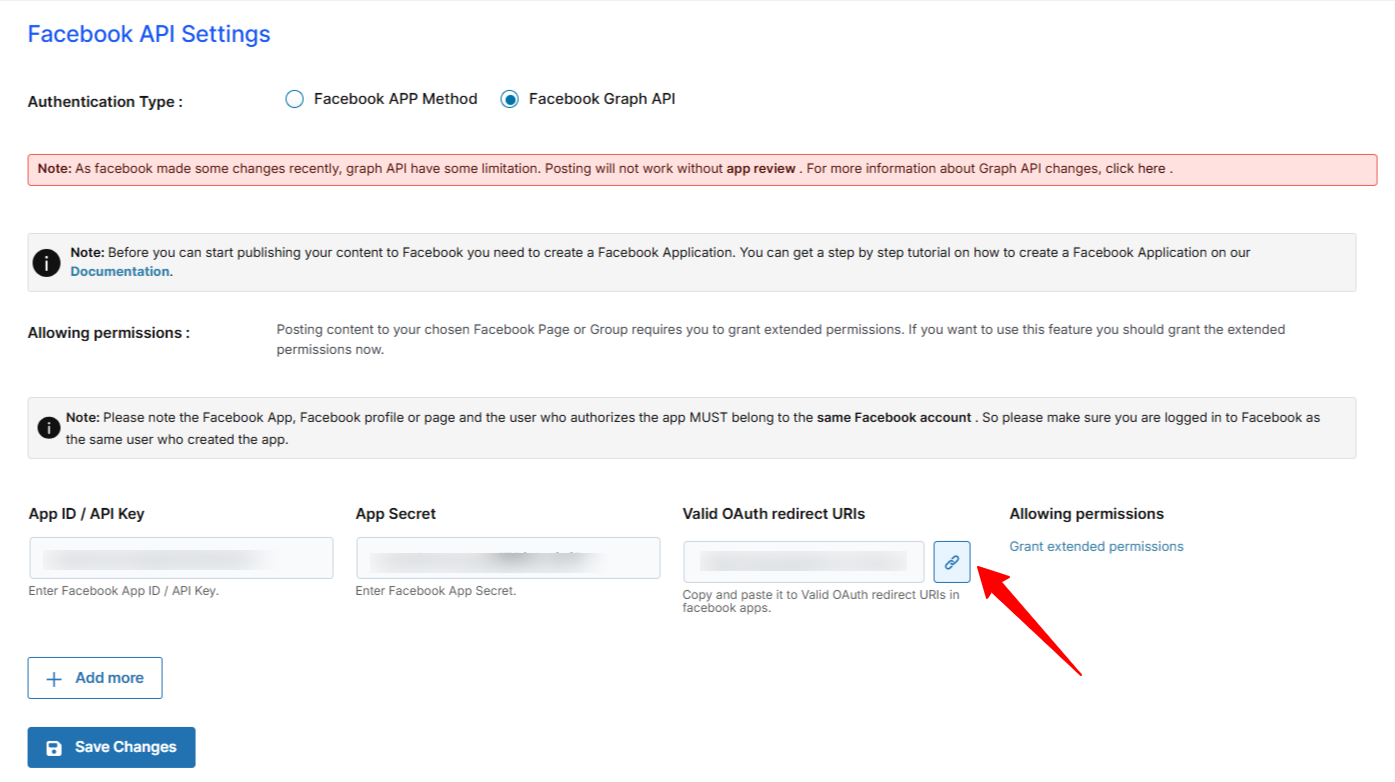
1. Firstly I should go to social auto poster – Facebook settings and enter API key and secret and grant the extended permissions. Check the screenshots: http://prntscr.com/qcyng3
2. Now, scroll down and as shown in the screenshot, please enter API key and API secret. After ading that save the settings. Once you save the settings, valid OAuth URL will appears, that you have to add in the Facebook Graph
API in valid OAuth URL field: http://prntscr.com/qcyp69
3. After doing that you have to click on grant the extended permissions.
4. Once you grant the extended permissions, all Facebook pages and groups get listed at a place shown in the screenshot: http://prntscr.com/qcyuum
5. You can select the posting account from there.
6. Now, go to add new post and edit title, enable publish post on Facebook and hit publish button. Once you hit publish button the post will automatically pget published on Facebook accout, page, group that I have selected.
I mentioned steps in the screenshot below: http://prntscr.com/qcyw8v
7. It’s done. I set up my Facebook account.
Let’s create a new blog post.
Before: http://prntscr.com/oju9jr
Result: http://prntscr.com/ojubvi
Step 9:
After reviewed by facebook, they will ask for enter the business details. (At the time of app submission this option is not available. We can see this after the review of facebook)
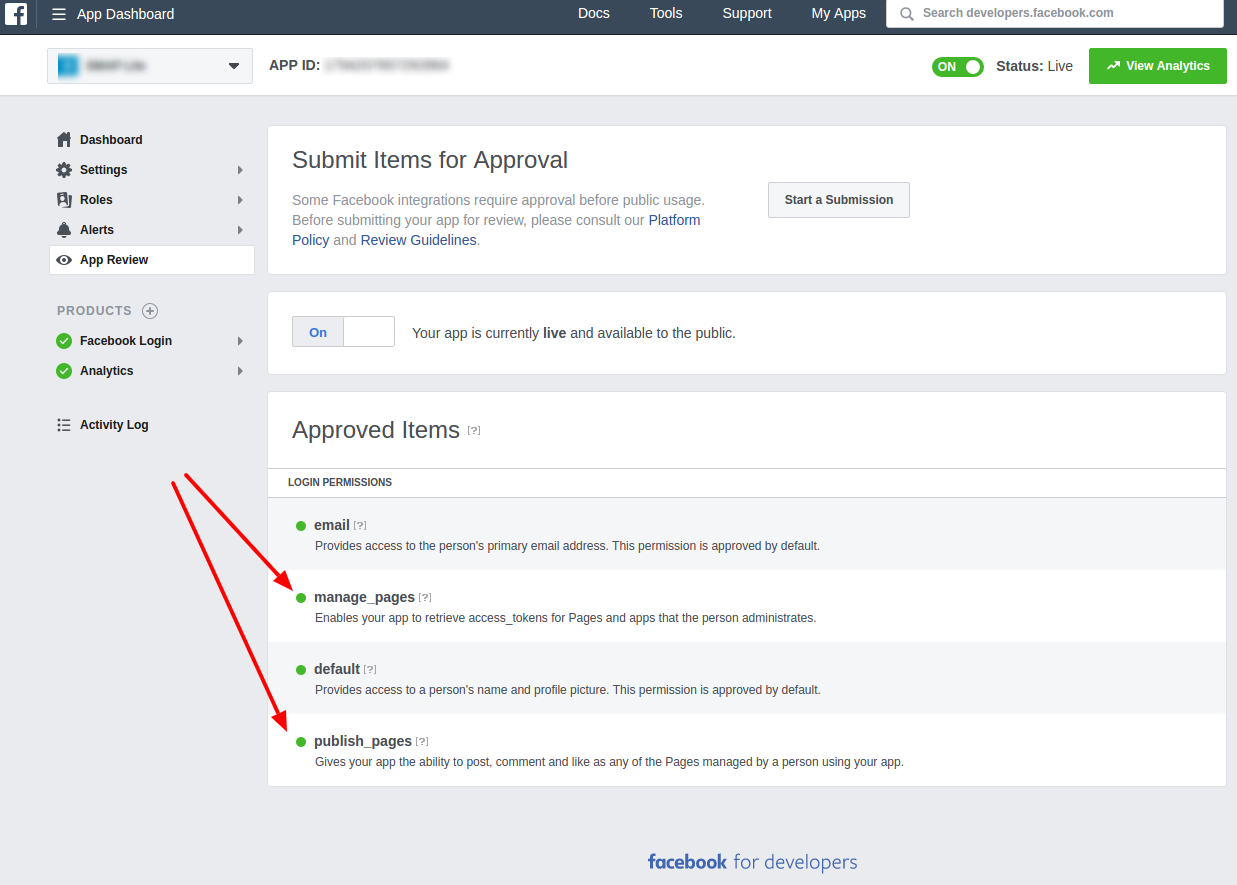
Once the app get approved, you can see the permissions approved with a green bubble under the “Approved Items”.
Now make the app “Live”
To make the app ‘Live/Public’, please go to the ‘App Review‘ page.
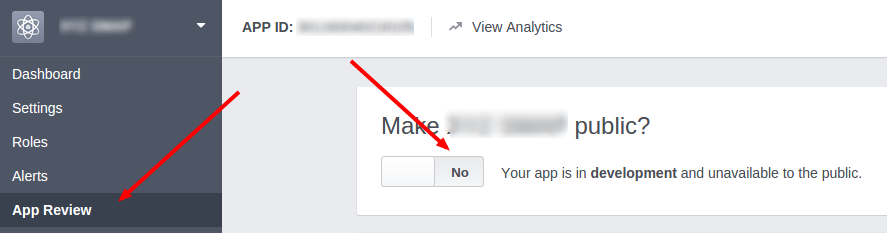
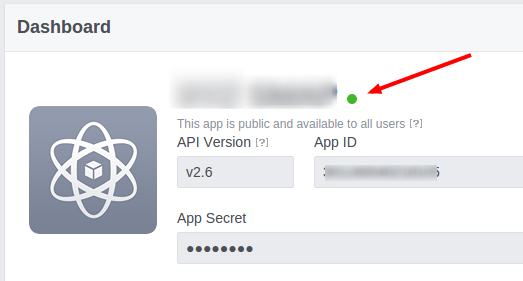
In this page please select the ‘Live/Public’ mode by selecting the ‘YES’ button and a ‘green indicator’ will display next to the app name as in the below image.
You can now use the facebook app keys in the plugin.
Now enter these keys in the plugin settings in your site.
After entering the keys in the facebook settings page, you need to “Authorize” the account. (The authorization section is present in the wordpress plugin section).
You can see the FB pages in the settings page only after authorizing FB account.
When you click on the “Authorize” button, it will redirect to a facebook popup dialog box.
Step 1:
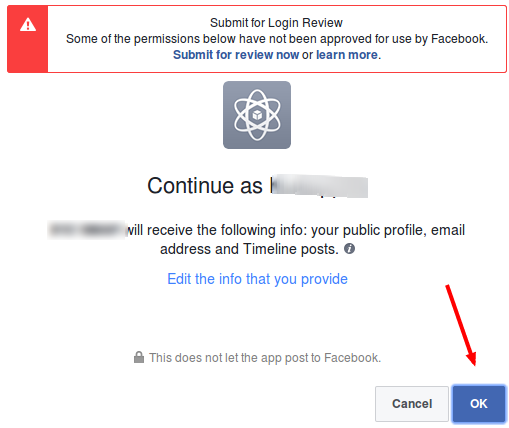
There is some warnings and you can ignore the warning and click the “OK” button.
Step 2:
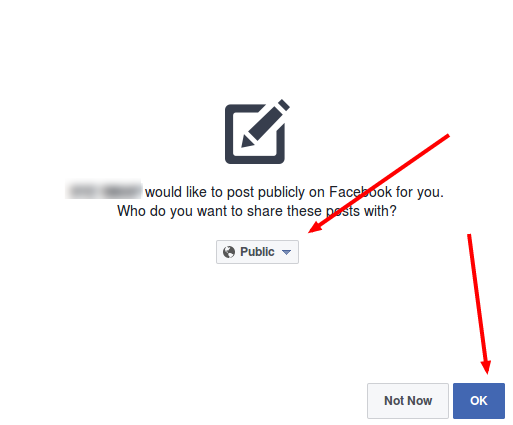
Select the “Public” option and click OK.
Step 3:

In the step 3 click OK and the authorization is complete.
Now you can see all your fb pages and you can select the fb page to auto publish.

Note: If you are doing group posting, you have to add your Facebook app within that group on which you are posting. Follow the steps mentioned in the link here.